Road studs are commonly known as cat eyes. These play a crucial role in improving road safety, especially during nighttime and poor weather conditions. These are also known as reflective markers, which enhance lane visibility, guide drivers accurately, and reduce the risk of accidents on highways and urban streets.
Research indicates that well-designed and properly placed road markings can reduce nighttime crashes by up to 40 percent on unlit roads. This highlights the importance of using high-quality road studs to support clear road delineation.
Available in different shapes, colors, and materials, road studs suit various road environments and traffic volumes. Understanding their types, materials, and installation methods helps engineers and contractors ensure long-term road safety performance.
Road studs, often referred to as cat eyes, are reflective safety devices embedded or fixed onto road surfaces. They mark lanes, edges, and hazard zones, especially when painted lines become difficult to see due to darkness, rain, or fog.
By reflecting vehicle headlights back toward drivers, road studs provide continuous visual guidance and improve driver confidence.
Shank studs have a protruding stem or shaft that goes into drilled holes in the road surface. The stem fits into the hole, and an adhesive or resin fills gaps around it to secure the stud. Shank studs are ideal for roads with heavy traffic loads.
The stem provides strong anchorage that helps prevent studs from dislodging when vehicles pass over them. These types work well on highways and arterial roads.
Shankless studs sit flush on the road surface and do not require a drilled hole. They are installed using strong adhesives bonded directly to the road.
This design makes installation quicker and suitable for roads where drilling may damage the pavement. Urban streets and parking areas often use shankless studs because traffic speed is lower and installation needs to be efficient.
Passive road studs rely solely on reflective materials to catch and bounce back light from vehicle headlights. These studs do not have any power source. They use tiny glass beads, prismatic surfaces, or reflective sheeting embedded into the stud surface.
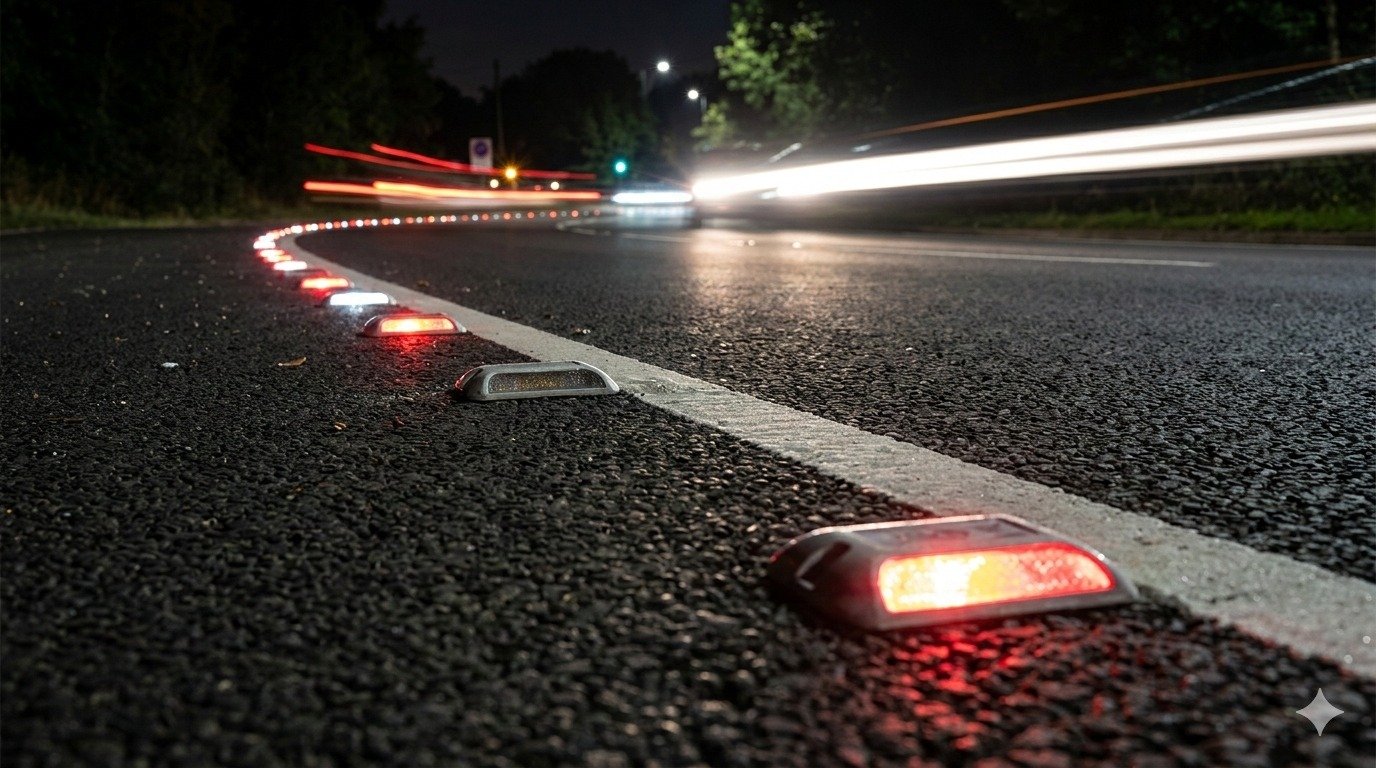
Active road studs produce their own light using LED systems powered by solar panels or electrical circuits.
These studs are highly effective in areas with poor street lighting or where road lightning is absent. Many solar road studs remain visible from distances of 800 to 1,000 meters under clear conditions to offer superior guidance in fog or heavy rain.
Tunnels, bridges, sharp curves, and open stretches of highway use active studs to provide continuous visibility even in fog, heavy rain, or darkness.
Road studs are made using a variety of materials. Each material offers unique strength, durability, and cost benefits.
Plastic road studs are lightweight and easy to install. The plastic body holds reflective components securely. These studs perform well in moderate traffic areas like city streets and secondary roads. Maintenance involves checking reflectivity and cleaning debris off the surface.
Aluminum studs are stronger than plastic and resist wear from heavy traffic loads. Highways, expressways, and busy intersections often use aluminum studs due to their durability. Aluminum also resists corrosion which increases service life.
Ceramic studs combine strong wear resistance with good reflectivity. Traffic engineers sometimes choose ceramic studs where heavy braking, acceleration, or sharp turns occur. Surface wear may still happen, so occasional replacement ensures visibility remains high.
Glass is mainly used for reflective elements on both plastic and ceramic studs. Glass beads or prismatic glass panels deliver strong reflectivity because they bounce light back toward drivers. These reflective surfaces are highly visible at night.
Solar road studs contain an internal solar panel and battery. They absorb sunlight during the day to power LEDs at night. Solar units often have protective housings to guard against rain, dust, and heat stress. Active illumination makes solar studs useful in areas lacking street lights.
Colors on road studs communicate specific road instructions to drivers. Color coding helps drivers interpret lane usage and hazard zones quickly at night or in poor visibility.
Yellow studs indicate caution areas. These are used near medians, lane splits, and areas where traffic direction changes. The yellow color signals drivers to stay alert and prepare for possible lane shifts.
Red studs mark road edges where entry is prohibited or dangerous. They can also highlight immediate hazard zones such as raised medians, closed lanes, and construction areas. Seeing red studs warns drivers to avoid those areas.
White studs indicate normal traffic lanes moving in the same direction. These studs help drivers stay within lane boundaries and follow the correct route paths. Continuous white studs are especially helpful on highways without adequate lighting.
Green studs show areas where crossing or entry is allowed. These studs indicate access points such as emergency vehicle lanes, turn pockets, or safe accelerators. Green color gives drivers visual confirmation that the area is permitted for movement.

Installing road studs correctly ensures long durability and proper visibility. A good installation process helps road studs remain fixed and effective for years. Before starting installation, assemble necessary tools and materials.
Preparing the road surface is crucial. The surface must be clean, dry, and free from debris or oil. Dirt, water, or loose particles will weaken adhesion and may cause studs to dislodge. If the pavement is cracked or uneven, repair those areas before installation.
Traffic should be stopped or diverted in the installation area so workers can operate safely. Clearing the working area creates a safe environment and improves focus during installation.
Proper spacing gives drivers a clear line of sight. Use chalk or temporary paint to mark where each stud will be installed. The exact spacing depends on road speed and environment.
Roads with higher speed limits require studs at closer intervals. Curves and intersections often need tighter spacing so drivers receive early prompts. Planning and marking ensure an even layout before actual fixing begins.
For shank road studs, drill holes at marked points. Hole diameter must match stud shank size. Depth should allow the stud to sit flush with the road surface once fixed.
Avoid deep or oversized holes as that weakens the bond strength. Clean dust from holes using a brush or compressed air before applying adhesive or resin.
Use the adhesive recommended for your road surface type. Mixing instructions vary, so follow guidelines from adhesive manufacturers carefully. The right adhesive consistency ensures a strong bond between the stud and pavement.
Pour adhesive into a container and mix thoroughly until smooth. Clumps or unmixed resin components weaken the adhesive bond.
Place each stud precisely at marked points. Press firmly so the base sticks well to the road surface. For shank studs, insert the stud shank into the drilled hole before pressing.
Check each stud to ensure it sits level and aligned with the planned layout. Poor alignment reduces visibility and distracts drivers.
Adhesive needs time to harden and form a secure bond. Traffic must remain blocked until curing finishes. Curing times vary, often ranging from a few hours to overnight. Rushing this step leads to loose studs that can be dislodged once vehicles start passing.
After curing, test studs by applying pressure or lightly driving over installation areas. Check for rocking or movement. Any loose studs require reattachment before opening the road fully to traffic. Testing confirms the installation is solid and safe.
Periodic checks ensure studs remain clean and reflective. Remove dust or mud that may accumulate over time. Inspect active studs for battery and light performance if LEDs are used. Regular maintenance preserves visibility and extends the lifespan of the road studs.
Road studs help drivers by offering visual guidance and early warnings that reduce risks on the road.
Studs clearly define limits of the road where painted lines are easily hidden by night or bad weather. This edge marking prevents vehicles from drifting off the roadway.
Placing studs closer together on bends helps drivers notice curves earlier. The pattern change leads drivers to slow down and steer safely.
Red and yellow studs highlight danger zones such as median closings, no‑entry points, and high‑risk intersections. These cues alert drivers to slow down and proceed carefully.
Raised studs that produce audible feedback when crossed encourage drivers to maintain lane discipline and reduce speed when necessary. This tactile signal helps drivers stay focused.
Road studs, or cat eyes, are essential for guiding drivers, especially at places where visibility is challenged by night or weather. Selecting the right type, color, and material improves road safety and helps traffic move smoothly. Proper installation and maintenance ensure these markers remain effective and reliable for a long time. As roads evolve and traffic continues to grow, smart road stud systems will remain a key element in building safer road networks for everyone.
Road studs, or cat eyes, are reflective markers installed on roads to guide drivers, improve lane visibility, and enhance safety during night driving or adverse weather conditions.
Shank studs are fixed into drilled holes for extra strength, suitable for highways. Shankless studs use adhesive directly on the surface, ideal for urban streets with lower traffic speeds.
Road studs are made of plastic, aluminum, ceramic, glass, or solar components. Each material offers different durability, reflectivity, and suitability for specific traffic conditions.
White indicates same-direction lanes, yellow warns of opposing lanes or medians, red marks restricted areas, and green highlights safe access or emergency routes. Color coding guides drivers effectively.